The Material CDK released Drag and Drop in version 7, and it offers a powerful api for supporting drag and drop in your Angular app! The Material Tree is also a recent addition to Material, and it makes it possible to display structured data like a file explorer.
Together, Drag and Drop and Material Tree don’t work out of the box because you have to manipulate the data based on the input from the drag and drop event. Not only that, but manipulating the data requires rebuilding the tree, and if you rebuild the tree, you lose your expand state, so we must make a way to persist the tree’s expand state as well.
To understand how I accomplished this, I’ve broken it up into parts which I will cover in this article. But if you want to dive right into the code, check out the demo:
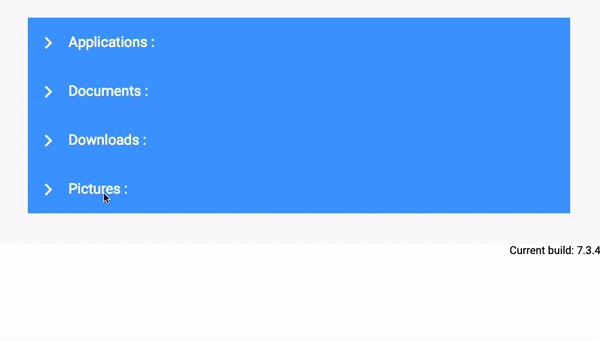
Material Tree
First, understand that the Material tree comes in two flavors: Flat and Nested. They both deliver the same user experience, but in different ways. In order to integrate drag and drop, we need to use the flat tree, because it builds the DOM as single-depth list, using various levels of padding to show nesting. In this article, I won’t go into the intricacies of the tree. But since I’m building on the stackblitz example linked right from the documentation it should be easy to understand.
Markup
Starting with the basic tree markup, you add the CDK drag and drop directives and handlers. The complete markup looks like this:
This is the example markup, plus some CDK directives. The mat-tree element gets the following, which identify the list container and handle the drop event:
Each mat-tree-node element gets the following, to identify a draggable element and to include node data in the drop handler:
Styling
Moving on to styling, which is important! CSS really brings the drag and drop interaction to life. It provides the feeling of “picking up” an element, but we also animate list nodes moving out of the way for an item, and animate it dropping into place. This styling can be added to your global stylesheet:
If you substitute .mat-tree-node for another list element you can re-use this CSS for any drag and drop list.
Handling the drop
That was easy; now we can get into the tricky part. Handling the drop is a fairly lengthy function, and I will refer you to the file in question if you would like to read every line; the code is well-commented. Suffice it to say, what we are doing in this function is cloning the data source data and mutating it, then rebuilding the tree with the mutated data.
The drop $event gives us previous index, current index, some list data and also our node data since we included [cdkDragData]="node" on the tree node markup. If we could just use the indexes to splice the node out of the array and into its new position it would be easy. But it’s not that simple, because the CDK is giving us indexes which relate to the DOM, which is a flat list, omitting children of collapsed nodes, not our actual data source of nested arrays. The tree needs to consume a data source; we can’t give it the flattened DOM list. So we need to mutate the data source from the drop event data which pertains to the flat list.
Can I see your ID?
The logic in the drop handler first identifies the node being moved by a unique ID. To do this we need to add id as a property for both FileNode and add it to the constructor of FileFlatNode. If you already have unique IDs, great! But if not, I developed a simple way to create unique IDs by passing a parent ID to the buildFileTree method. This appends the index of the item, and gets passed to its children when called recursively:
Now that we have an ID, we can find the array that holds the dropped node in our data source with another recursive function, findNodeSiblings(), and then splice it out of that array. Now we need to find the destination array.
To do this we use a method, visibleNodes(): FileNode[] which constructs an array of nodes that matches the DOM at the time of the drop. This is not exposed by the CDK, so I wrote this method. Using this array, with some logic that uses the currentIndex passed from the drop event, we can determine the destination array and splice in the moved node.
Finally it calls a method that reassigns the new changed data to the data source, then restores the expansion state.
Persisting the expanded state of each node
To persist the expanded state of the nodes, we are using a SelectionModel. This is a simple class that keeps track of toggle state by storing IDs in an array and providing a method to toggle them. It’s initialized like so, with true to allow multiple items to be open at once:
Then in your markup add a click handler on the matTreeNodeToggle:
The expansion state is read from the expansion model and restored in the rebuildTreeForData method.
Wrapping up
I hope this has been helpful. Restructuring the tree data based on the drop event was quite the challenge, so hopefully this will save you a lot of time. There is still more to do though: like auto-expanding nodes as you drag over them. That is a work in progress and you can try it out in the stackblitz demo.