Earlier this year, I wrote an Angular Schematic to automatically install the awesome UI testing framework, Cypress. If you’d like to read more about the initial release and that process, check out this article:
Now I’d like to walk you through the updates I’ve made to the library, including the implementation of a custom Angular CLI builder which allows you to run ng e2e to start Cypress.
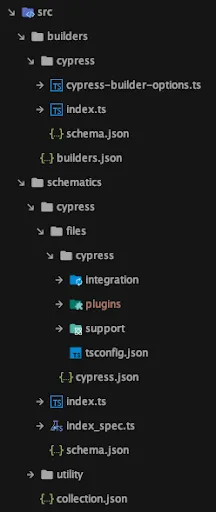
Starting at a high level, I’ve made some changes to the library structure. As you can see below, I’ve added two directories at the src/ level: builders/ and schematics/. Each has its own root json file: builders.json for builders/ and collection.json for schematics/. Personally, I like the specificity and organization having these files in separate directories provide.
Library Structure
The Builder
One of the nice things about writing a custom builder is that the process is very similar to writing a schematic itself. The builders.json file is a kind of registry of the builders in your library:
builders/builders.json
Just like the schematic, the builder takes a json schema and description, as well as implementation. The schema contains metadata and properties for your builder:
builders/cypress/schema.json
These properties are all of the potential options you’re able to pass to cypress through the command line. For a property like browser, you would use the option as --browser="chrome" and for a boolean type property such as headless, you would just enter --headless.
The implementation property of the builders.json points you to the actual builder logic. In this case, I have an index.ts file under the cypress/directory so I use the value './cypress'. I’m going to break this file up into chunks as we walk through it but, if you’d like to see the entire file, click here:
builders/cypress/index.ts • part I
The first thing you see here is const cypress = require('cypress');. I initially attempted to use an es6 import, but for some reason that caused internal Cypress tests to fail. After that, I call an @angular-devkit/architect method called createBuilder with an explicit generic type of <CypressBuilderOptions> and run passed in as a parameter.
builders/cypress/cypress-builder-options.ts
This interface may look familiar, and that’s because it matches up with the schema.json properties. Not everyone creates a custom interface for typing their options.The Angular.io documentation examples use options:JsonObject, but I like the specificity this type provides.
Back in the run method, there’s some configuration of options and a few lines which help manage workspace pathing for windows. If there is a devServerTarget set, the startDevServer method is called. Otherwise, Cypress is opened using the baseUrl. Once the server has been established, the initCypress method is called with the options and baseUrl. initCypress is an Observable of a BuilderOutput, so I use the RxJS operator take(1) if the watch option is not enabled. The initCypress method is where Cypress is launched from:
builders/cypress/index.ts • part II
After making sure options.project points to the correct project path, I map the rest of the Cypress options to user input or default values. If the user enters the headless option or disables watch, cypress.run(options)will be called. Otherwise, cypress.open(options) will open the Cypress UI. That’s it for the custom builder, but I did make some changes to the schematic as well.
The Schematic
The biggest change to the schematic itself is wiring up the new builder. Instead of adding cypress-open and cypress-run scripts to the package.json, I modify and add new CLI commands in the angular.json.
schematics/cypress/index.ts • part I
On line 9, I’ve added a condition on a new option, noBuilder. If you don’t want to include the custom builder and add new commands to the angular.json, you can install using ng add @briebug/cypress-schematic --noBuilder. By default, noBuilder is set to false, and the modifyAngularJson method is called:
schematics/cypress/index.ts • part II
The major changes in this method are the creation of two new json entries (cypressRunJson and cypressOpenJson) and the call to addNewCypressCommands:
schematics/cypress/index.ts • part III
In this method, I’ve created projectArchitectJson based on the selected project’s architect object. I always create the new cypress-run and cypress-open commands and, if removeProtractor is true, I re-create the e2e command with the openJson value. Finally, using the schematics Tree interface I overwrite the existing angular.json with the modified values.
This update gives us the ability to skip the package.json scripts and tap straight into the Angular CLI through custom builders. Hopefully this article helps if you’re interested in adding your own features or modifying existing functionality in the CLI.